Fields
- Format: ttf
- License: CC0
This is where you can manage the custom fields that you want to incorporate into your form. Each field can be utilized across multiple forms and can work together to enhance the overall user experience for what data you want to capture. There are several field types that are available to choose from.

Use the top toolbar to add/modify/delete/publish/unpublish fields. All these buttons ( except "Add new" ) can be used only after at least one field is selected from the field list.
Here is a breakdown of each button:
-
Add new
Add a new field. -
Modify
Modify the parameters for an existing profile. -
Delete
Delete one or more fields. -
Publish
Set a field usable in the front end. -
Unpublish
Set a field unusable in the front end. - Batch
Edit a series of fields at the same time to select a specific action and apply it to all selected fields.
You can select one or more field records by clicking on the checkbox in the first column of the table. Click the top checkbox to select all the field records on this page.
On top of the table, you have some tools that will help you filter the fields. Enter a partial/entire name of the field and click "Go" to filter the fields. Click "Reset" to remove the filter. (This works the same way as filtering within the Article portion of Joomla.)
Click on the name of each column of the table to order the records by that column. Click a second time to order the records in reverse order. Click "Reset" to cancel the ordering.
Add/Edit Fields
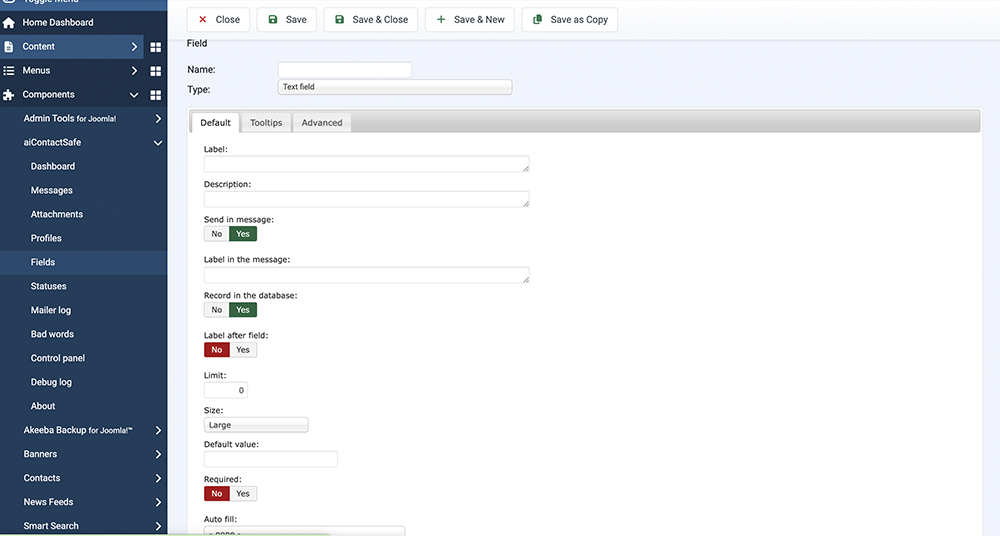
This is where you can add/edit a field. Use the top toolbar to save, apply or cancel the information entered into the form.
Here is a breakdown for each portion of the field (please note that some field types might have additional information and parameters that need to be completed in order to ensure full functionality):
-
Field name
Name of the field. This is what will be seen in the backend. -
Field Type
Determine which type of field you would like to use. -
Label
The label of the field. While there is a default appearance for these labels, you can utilize HTML tags for further customization.
For example, you can set the way the field is displayed using CSS properties. See "Field parameters" for more information.
Filling out this field automatically fills in the "Label in the Message" field. -
Description
Use this field to add a description or instructions underneath the Field Label. While there is a default appearance for these labels, you can utilize HTML tags for further customization. -
Send in Message
Utilize this button to determine if you want this field to appear in the form submission. If not, you can select "no" and it will just appear on the front end of the form. -
Label in message
Here, you can specify a different field label to use in the form submission (message) compared to what was used for the "label," which is what is displayed on the front end of the form. You can utilize HTML tags with this field.
For example, you can set the way the field is displayed using CSS properties. See "Field parameters" for more information. -
Record in Database
Utilize this button to determine if you want this field to appear in the database. If not, you can select "no" and it will just appear on the front end of the form and not be recorded.We would suggest keeping this turned to "Yes."
-
Label after field
Activate (select "yes") this if you want to place the label on the right side of the field instead of the default position, which is to the left/on top of the field. - Field type
Select the type of the field. You can choose one of these options:- "Textbox"
- a short text - "Checkbox"
- a field with two values : true or false - "Combobox"
- a list of values you want to define - "Editbox"
- a longer text - "Checkbox - List"
- a list of possible values from which to choose - "Radio - List"
- a list of possible values from which only one can be chosen - "Date"
- request a date. A calendar is available for an easier utilization. - "Email"
- request an email to which to send the message. - "Email - List"
- enter a list of emails from which the sender can choose the destination of his message
- See "Field values" for instructions on how to use this field - "Joomla Contacts"
- the list of contacts added in Joomla from which the sender can choose the destination of his message - "Joomla Users"
- the list of users added in Joomla from which the sender can choose the destination of his message - "Hidden"
- a field that will not be displayed on the contact form. You can use it to place a text in all messages.
- See "Field values" for instructions on how to use this field - "Separator"
- add a space between two fields of the form - "File"
- attach a file to the message - "Number"
- a field in which only digits can be entered -
"Hidden Email"
- a field, not displayed in the form, used to add more destinations for the message
- "Textbox"
-
Default Value:
The default value field is available for various field types. However, it serves different functions based on the fields selected. This field can operate as a place to input emails and a series of options.-
Emails
This is only used with the field types that contain an email ("Email", "Email - List", "Joomla Contacts", "Joomla Users", "SOBI2 Entries"). If activated, the message is sent to the email address that the field type is connected to. It is ignored for the remaining field types.
For example, Service department:This email address is being protected from spambots. You need JavaScript enabled to view it. ;Sales department:sales@website.com;Alexandru Dobrin:alex@website.com. -
Series
In case you want to add a "Combobox" field, a "Checkbox - List" field, a "Radio - List" field or a "Hidden" field, here is where you can add the values to place in the list.- For a "Combobox" field, enter all the values separated by a semi-colon ";".
For example, for colors : red;yellow;green;blue;black. - For all other series field types, enter all the values in a paragraph format, pressing enter after each option. For each option, you will want to type it twice, once for the backend submission and the other time for the front-end view. Both should be separated by a colon ":"
For example, for colors, you would use the following format:
red:red
yellow:yellow
green:green
blue:blue
black:black
- For a "Combobox" field, enter all the values separated by a semi-colon ";".
-
-
Field limit
This will allow you to set a limit of characters a user can enter in a field. It is ignored for the field types that this limit is irrelevant. Setting this to 0 will disable the counting of characters in an editbox field. -
Size
Most fields will have a size parameter that features pre-determined size options (small, large, extra large, etc.). Use this to sylize your form. Remember that CSS options are still available, if needed. - Field parameters
Here you can set the parameters of the HTML tag that will be generated for this field. For example, you can set the way the field is displayed using CSS properties.
One of the most used parameters is the width of the field. In order to modify it you can enter this text into the field : style='width:250px;'. This will set the width to 250px.
Enter all the CSS values you want to use in just one style parameter separated by ";". For example... style='width:250px;color:red;'.You can find more information on CSS here: http://www.w3schools.com/css/default.asp.
-
Auto fill
Here you can select to fill the value of the field with a value from Joomla (like Joomla user name or email) if the user is logged in. Select "- none -" to disable this feature. - Default value
Here you can define a default value for the field. You can use these default values for each field type:- "Textbox"
- default text - "Checkbox"
- 1 if you want this field checked by default, 0 or empty otherwise - "Combobox"
- the position of the item you want to be selected by default starting from 0 (0 for the first one, 1 for the second, 2 for the third and so on) - "Editbox"
- default text - "Checkbox - List"
- a list with 1 (for checked) and 0 (unchecked) separated by ; for each item in the list (1;0;0;1 for first checked, second unchecked, third unchecked, fourth checked) - "Radio - List"
- the item you want to be selected by default - "Date"
- a date in the format yyyy-mm-dd (year-month-day) - "Email"
- the default email (not recommended since it can be found by spammers) - "Email - List"
- the position of the email you want to be selected by default starting from 0 (0 for the first one, 1 for the second, 2 for the third and so on) - "Joomla Contacts"
- the id of the contact - "Joomla Users"
- the id of the user - "Hidden"
- irrelevant - "Separator"
- irrelevant - "File"
- irrelevant - "Number"
- default number to enter in the field - "Hidden Email"
- default email for this field
- "Textbox"
-
Field sufix
Here you can specify a suffix to add to the field. -
Field prefix
Here you can specify a prefix to add to the field. -
Field required
Activate (checked) this if you want the sender to be forced to complete this field. -
Add in message
Activate (checked) or deactivate the sending of this field in the message. -
Published
Activate (checked) this if you want use this field in the contact form.
Delete Field
This is where you must confirm the deletion of one or more fields. You will have to select all the fields you want to delete, by clicking the checkbox on the left side of the field name.
Click "Cancel" to cancel the deletion of the fields.
Warning !!!
After you confirm the deletion, you will not be able to recover the deleted field(s).